DAW setup
One of the biggest keys to efficient composing is having a great template. Whether you’re using multiple computers and VEP, or doing it all on one machine, make sure your template is working for you in such a way that you spend as little time as possible dealing with “housekeeping” tasks such as setting up tracks and routing outputs. Below are some tips I’ve picked up over the years as well as how I setup my own template.
- Have all your go-to sounds at your fingertips. Make sure all those sounds are loaded in your template and properly routed so that all you have to do is go to the chosen track and start playing
- If your DAW supports them, use folders to organize your tracks by groups (i.e. Woodwinds, Brass, Percussion, Strings, Pads, etc.)
- Use colors to keep things organized. For example color all tracks & their enclosing folder the same color.
- Keep track names short by using consistent abbreviations (i.e. Always Vn or Vln but not both).
- Use CAPS and lowercase when naming different track types. For example use Proper English (Capitalized first letter) for instrument tracks, lowercase for MIDI tracks and CAPS for stems.
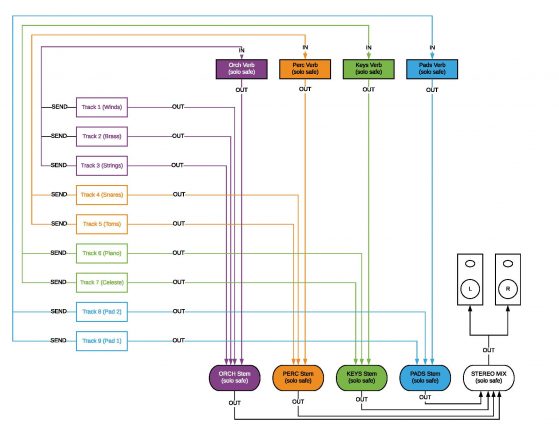
- Create stem aux tracks and route your individual tracks to the appropriate stems (don’t forget to match the stem color to the corresponding track colors). For example Woodwinds, Brass, Percussion, Strings,, Pads, etc.). Solo-safe (aka solo-defeat) your stems so you don’t lose signal when soloing individual tracks.
- Route all of your stems to a Stereo Mix stem. Like the other stems, make sure you solo-safe your Stereo Mix stem. Set the output of this stem to your physical output that goes to your speakers. Avoid adding mastering plug-ins on your Stereo Mix stem in order to make sure all your stems at unity equal your stereo mix. It’s Ok to have some light limiting to avoid clipping.
- Create individual reverbs/delays or other group effects for each stem and route the outputs of those reverbs to the corresponding stems. Don’t forget to color code them to match.
- When using instrument tracks, set the output of each instrument to the appropriate stem. If you’re using a combination of instrument tracks, MIDI tracks and aux-returns from the instrument tracks, set the outputs of the aux-returns to the corresponding stem just as you would an instrument track.
- Use sends to add reverb (or delay or any other group effects) to your tracks. Assign all the appropriate sends in the individual tracks to the appropriate reverbs so it is all pre-routed within your template.
- If you want to add any kind of effect plug-ins to individual tracks use the inserts of those tracks.
- Create empty tracks with plug-ins loaded and routed to appropriate stems for sounds where you may need to browse through patches. That way they will be pre-routed to the appropriate stems and all you have to do is search for the patch you want without needing to set anything up.
- Create empty audio tracks (both mono & stereo) that are routed to the appropriate stems and have the appropriate inputs set. That way whether you’re recording locally or having someone record remotely and send you the audio you have tracks ready to go and all you have to do is record/bring in the audio.
- Create a Dialog/FX track (or if your guides are split, one for each), a Temp music track & an overlapping music track and have their outputs all routed directly to your physical output. That way you can never accidentally print stems with reference audio married to them. When you write cues that overlap with others you can import the stereo mix of the overlapping cue into that track to help you hear exactly how the overlap will sound.
Below are some screenshots from my Cubase template to demonstrate this workflow and give you some ideas. There’s no right or wrong template, this is just for reference. I use Cubase and do everything on a single PC. I use individual instrument tracks for every sound I need rather than using instrument tracks with multiple different patches and aux returns to separate them. However I like to have all my articulations loaded for each instrument and use key-switches to control my articulations. I have all but my piano sound disabled by default and enable tracks as I need them. This may not be right for you and how you like to work. Do what works for you. Hopefully you’ll get some good ideas from reviewing my template.

(click for larger image)

(click for larger image)

(click for larger image)

(click for larger image)

(click for larger image)

(click for larger image)

(click for larger image)
Using the signal flow described above, you’ll be able to quickly print stage-ready stems by printing your stem tracks. At the same time if you’re having someone else mix your tracks and want to give them dry tracks you can simply print all your individual tracks instead of the stems. Keep in mind that any insert effects you have on individual tracks will be printed unless you bypass/disable the plug-ins first, but you usually want those types of effects printed as they are part of your sound. You can even print the reverbs separately if you wish for reference. This type of signal flow offers a lot of flexibility, which is why I like working this way.
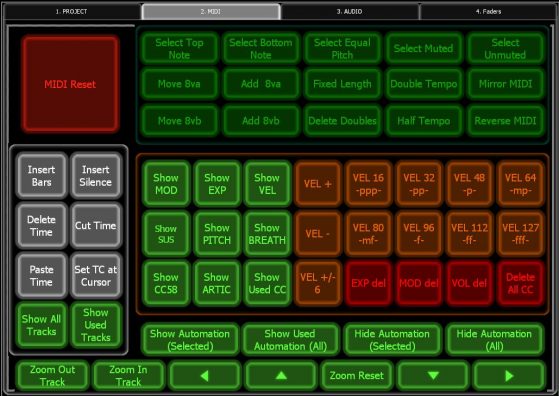
If your DAW allows you to customize your shortcuts, take the time to do so and and shortcuts to functions you use often. This will help speed up your work. Some DAWS allow you to program macros, use them to program repetitive actions so you don’t have to do them manually over and over. If you have a tablet use Lemur or Touch OSC to create buttons to activate functions you use often. This will also help speed up your work and frees you up from having to remember tons of shortcuts.
There are lots of templates available online (some free, some paid), which can make a great starting point. I use Lemur and have a 4 page layout that works well for me. Just as with your template, there’s no right or wrong, just what works for your workflow. Feel free to review the screenshots of my layout below for some ideas when creating your own.

(Click for larger image)

(click for larger image)

(click for larger image)
Finally, start your music at bar 5 instead of bar 1. You never know when you might need to do a revision that involves starting the cue a bit sooner, it happens all the time. Having a few empty bars makes it easy to go back for stuff like that. It also creates a moment of silence before the music starts that can help let lingering effects ring out when you’re jumping around, and allows volume and other automation settings to jump back to the right spot before the music begins so when you play it sounds right. This is especially important when printing your cues.


